Here’s a step-by-step guide on how to start with eHostia after receiving the email with the object “Hosting details for your order ” containing all the information you need:
Step 1: Login to Hestia CP
Open your web browser and navigate to the web address provided in the email from eHostia. The address has the following form “vmxxxxxxx.ehostia.net”.

On the Hestia Control Panel login page, enter the username and password also provided in the email from eHostia.

Click on the “Login” button to access your HestiaCP account.

Once you are logged in, you will be directed to the HestiaCP dashboard where you can manage your web hosting services, create websites, and access other features.
If you have any trouble logging in, please get in touch with eHostia support for assistance.
Step 2: Change Admin Password
For security reasons, it is highly recommended to change the temporary password provided in the email as soon as you log in to HestiaCP for the first time, to achieve this:
From the list of users, select the “Admin” user and click the “Edit” button.
Scroll down to the “Password” section and enter your new password in the designated field.
Make sure to choose a strong and secure password consisting of a combination of letters, numbers, and special characters.
Click on the “Save Changes” button to apply the changes.

Log out of HestiaCP and log in using your new password to ensure that it was successfully changed.
Step 3: Add a New User
For security reasons, HestiaCP does not allow users to create websites using the “admin” account. Instead, a new user must be added and assigned a package to create a website. This enhances the security of the websites hosted on HestiaCP and reduces the risk of unauthorized access and potential security breaches.
To add a new user to Hestia Control Panel (HestiaCP) follow these steps:
Click on the “Users” option from the left-side menu and then on the “Add User” button at the top-right corner.

Enter the user’s information, including the username, email address, and password, and then click on the “Save” button to complete the process.

Step 4: Log in With Your New User And Add a New WordPress Website
Hestia CP is a control panel that allows you to manage your website, domain, and hosting, all in one place. In the following lines, you will learn how to install WordPress on Hestia CP.
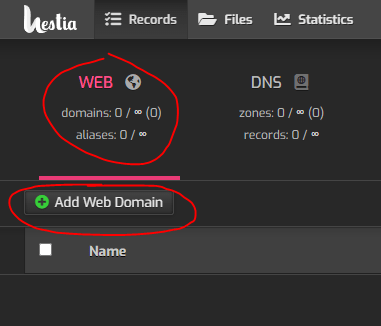
Once you’ve created a new user, log out of the administrator account and log back in as the new user. From here, go to the “Websites” section and click on “Add Web Domain”
Enter the details for your website, such as the domain name. You can also enable mail if you want to set up an email server to send and receive emails:

Point your website to the IP address provided in the email using your DNS provider (e.g. Cloudflare)

Now that you’ve created a website, you’re ready to install WordPress. From the “Web” section, click on the website you just created and go to “Quick Install App”.

From here, select “WordPress” and click “Setup” Follow the on-screen instructions to complete the installation process.

Click on Install when you are done.

Now you may not be able to access your website because of an invalid SSL certificate. To fix this, go back to “Web” and select your website. On this page, enable SSL and use the Let’s Encrypt SSL certificate. To prevent any errors, be sure that you have pointed both www and non-www to the IP in your DNS


And congratulations, now you can log in and manage your WordPress website as usual!

Step 5: Create an Email Server
An email server is crucial for any business or organization that wants to maintain professional communication with its customers, clients, and partners. In the following lines, we will show you how to create an email server using Hestia Control Panel.
The first thing to do is to click on the “Mail” tab. Then click on your domain name.

Click on the “Add Mail Account” button to create a new email account.

Enter the account name, for example, “support” for [email protected]. Enter your password or generate a random password by clicking on the green icon. Click on Save when you are done.

Add a new A record named webmail to access your email client.

It’s now highly recommended to install an SSL certificate on your newly created subdomain. Click on “Mail”, then on “Edit Mail Domain icon”

Then activate “Enable SSL for this domain” and “Use Lets Encrypt to obtain SSL certificate”. Click “Save” to apply changes.

You can now access your email client and connect to your account by going to webmail.yourwebsite.com and entering your login credentials.

To start sending and receiving emails, you need first to configure your DNS. Click on “Mail” then on the “DNS Records” blue icon.

You will see a list of records, copy them and paste them into your DNS manager (for example Cloudflare).

When creating the first record, if you are using Cloudflare like us, be sure to turn off the proxy, as your server will not be able to receive emails otherwise.

Here’s the final result of our DNS:

Finally, test your email server to make sure it’s working properly!


